Showing posts with label Design. Show all posts

Friday, July 13, 2012

Don't Blink- You'll Miss It!

I know it's totally cliche to say this, but where is the time going?  I mean- really!

Not only is Aubrey transforming from a baby to a little girl right before my eyes (more about this below), but I'm already 17 weeks along with little sister.  Little sister is now the size of a sweet potato-- we've got a long way to go before she's the size of a watermelon, but it seems like we found out we were having another baby just yesterday!  I'm one of those people who will nest throughout the ENTIRE pregnancy.  I did it last time, and I've found myself doing it again.   It is just an overwhelming urge to get everything perfectly in order.  My nesting is not limited to the nursery either- it's the entire house.

Here are a few projects that are stewing in my brain. Weston will die when he sees this! :)

Sewing slip covers for the dining room chairs, maybe without the pleat.
Source- anna-white.com 

Painting the dining room. How beautiful is this color with the white moulding?  The color is Homberg Gray by Sherwin Williams.

Source here

I'd like to finish up some decorating in the kitchen- complete with a dinner bell.  I love this ship bell.

Source here

I've got a million other ideas, and quite frankly I don't expect many of them to get done as my true focus needs to be on figuring out how to accommodate two little people in Aubrey's bedroom.  I plan for the girls to share the room once little sis is sleeping through the night-- so if any of you has a twin bed  you'd like to throw my way, bring it on!

I plan on sewing a rag quilt for Aubrey's big girl bed.  I haven't started looking for fabric quite yet, but my plan is to follow the tutorial below:

Source for tutorial here

Speaking of Aubrey... it seems she is doing something new every single day. I found a cool source of activities for toddlers on Pinterest that I can't wait to try with her.  She is a little sponge and is so ready to learn that I feel obligated to provide her with some fun sensory and educational activities.  Check out this blog for cool toddler activity ideas.  My favorite ideas are: the pom pom activity and the pasta activity.


And here's a long list of what Aubrey's up to these days:

  • Saying 'tee tee.'  She walks past the bathroom, points at the potty and says, 'tee tee.'  So last night we let her sit on the potty for a minute.  Nothing happened, but it was a great photo opp!  We'll have to get her a little potty so she can practice sitting.  
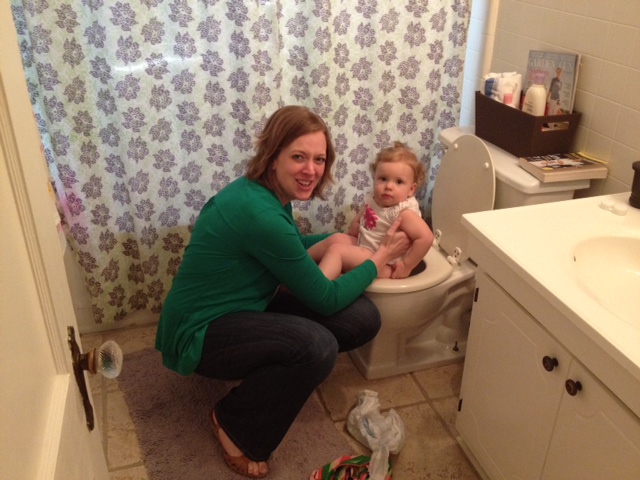
She looks totally freaked out. 
  • She can look Weston or I straight in the eye and call us "Mama" or "Dada."  She knows I'm mom and he's dad.  She calls our names when she wants something (which is also new). 
  • She can play "Ring Around the Rosies" and "London Bridge".  She can sing, "Ashes Ashes, Fall Down" and then fall to the floor. 
  • The days of non stop talking have begun.  We were taking a little Sunday drive and she made noise the entire time we were in the car.  She was singing, talking, blowing raspberries, etc..  
  • She is identifying all sorts of new things and able to call them by name.  She knows her hairbows are called "Bow."  She can say Diaper "Pi-Pi." 
  • She bows her head to pray when we bless our food.  She thinks it's real silly.
  • She's asking "What's that?" about everything.  
  • She can say "Cool!"
  • She can count to ten, although not on her own.  She knows how to make the noises for the numbers that come next.  
  • Her song repertoire is growing and now includes- Bye Baby Bunting, Ring Around the Rosies, Ba Ba Black Sheep, Jesus Loves Me, The song to 'Cat in the Hat', and ABC's.
  • She can blow kisses and put her finger to her mouth to make the "shhhhh" sound.  She doesn't actually make the sound yet, she just blows on her finger.
  • She loves Chloe more than Chloe loves her.  Aubrey tries to ride her, sit on her, hug her and tickle her.  Chloe tries to stay as far away as possible.

I guess that about sums it up.  Have a great weekend!


Lindsay 

Friday, June 8, 2012

DIY Curtain Panels

If you're a Pinterest person you've likely seen a million posts about things you can do with Painter's Drop Cloth.  
Source: Lowes

"What's the big deal with drop cloth anyways?"  Well I'll tell you what the big deal is-- it cost about $9 per drop cloth at your local home improvement store, the fabric is appx 9ft x 6 ft and it's a blank, neutral canvas for whatever you want to create!

Drop Cloth Curtains:
The problem- our ceilings and windows are both pretty tall and regular 84-inch curtains just wouldn't work. I either needed to make a trip to Dallas for Ikea curtains or make my own.  So I jumped on the bandwagon and used Drop Cloth to create drapes for our living room! Excuse the photos- as I've said before, photography is not my forte. 


I was able to make 6 curtain panels for a total of about $18. I simply needed the panels to frame the window and did not want to actually pull the drapes closed.   So I purchased 3 drop cloths and cut each in half (from top to bottom) for a total of 6 panels.  I hemmed the raw edges from where I cut down the middle and also hemmed the bottoms of the curtains to the length I needed.  *NOTE- after hemming all the curtains length-wise I got really lazy and used the iron-on hemming tape to hem the bottoms of the curtains. I used curtain rings to hang them- but you could also sew a pocket at the top for the curtain rod or even purchase and install grommets.  Just depends on what look you're going for.  I myself was going for quick and easy!

A few tips:
1. You need to launder the drop cloth 1-2 times before working with it.  Otherwise it will be really stiff and a little stinky.  Once laundered it looks like beautiful linen, but way less wrinkly.
2. Drop cloth packaged to look totally the same may be a little bit different.  Just compare what's inside the packaging to make sure the fabric is the same.
3. One of my drop cloth panels had a weird seam in the middle of it. I honestly didn't notice until I had already cut it.  Had I noticed earlier, I would have tried to exchange it.  So- inspect your drop cloth before cutting!
4. If you're cutting the drop cloths down the middle, just fold the drop cloth in half and cut.  It doesn't have to be perfect.  I'm somewhat of an idiot and the thought of folding down the middle and cutting didn't even occur to me.  I sat on the floor with my tape measure and a level, like a fool.

I've been really pleased with how they turned out.  They were easy and inexpensive!

You could trim your curtains with colored fabric or ribbon or even add a ruffle detail to the top, bottom, wherever. Katie at Creative Outlets of a Thrifty Minded Momma stenciled her curtains.  How cute is this?

Source: Creative Outlets of a Thrifty Minded Momma

Some other things you can do with painter's drop cloth.

Drop Cloth Pillows:

Source: A bowl full of lemons
Drop Cloth Towels (what a great gift!!):

Source: The Junk Nest
Drop Cloth Upholstery:

Source:  Inspired by you

 Happy crafting friends!

Monday, August 1, 2011

Finished Origami Mobile

Earlier I posted about making an origami mobile for Aubrey's room and I finally finished it! Aubrey was really pleased with how it turned out. :)

Total Cost:
About $5-$10

She loves it!

Steps:
1. Fold your paper cranes. I used origami paper and scrapbook paper. The scrapbook paper was harder to work with because its thickness.
2. Gather your supplies (needle, thread/floss, 1 pack of small beads, 2 dowel rods, paint, hook)
3. Cut your dowel rods to the desired size and paint them whatever color you want. I painted mine white. *I wish I had used flat dowel rods instead of rounded ones. You can also use wire.
4. Thread the floss through the paper crane and secure both sides of the crane with a metal bead (picture below).
5. Secure the dowel rods in a T-shape and hang the paper cranes from the rods.
6. Balance the mobile by moving your paper cranes farther in or out on the rod.
7. Cut excess string and hang from a hook on the ceiling.

Here are the instructions I found online and followed.

Supplies


Crane with the floss threaded through


Finished product

Saturday, March 19, 2011

Picture Frame Collage

I LOVE the idea of a well done picture frame collage. I can't wait to give it a try at the new place!

Some inspiration...


Okay I think I just like this one because there's a Boston in the picture!


This one is my favorite! I'll probably try to recreate this as best I can. First stop- hit Etsy and order some cool prints.


Check out this helpful "How To"


Friday, March 18, 2011

What's in a name?

Get a job. Check!
Get married. Check!
Have a baby. Check!
Buy a home. Check!
Start a blog....

Apparently when you complete all of the above you are supposed to start a blog. Or at least that's what it seems like. So here I go!

My intention is not to treat this blog like a diary. Nor is it to simply rip off some of my favorite blogs about design or style. I want to write about things I love-- food, family adventures, motherhood, good music, God, my new home, and anything else that seems interesting enough to share with the world.

Choosing a name for the blog was the hardest part! I wanted to choose a name that reflected something about me, my home, or the things I love. I wanted to use my last name- BROWN. I quickly realized that BROWN is a very unappealing word. One idea that came to mind was "The Daily Brown" (a tribute to Martha Stewart's puppy blog about her two frenchies)... but that just didn't have a nice ring to it if you know what I'm saying. Almost every title I came up with that referenced BROWN had some sort of potty connotation. The ideas were thoroughly entertaining, though. My favorite was "The Brown Movement."

So I settled on a name that means something to me.

"A Fairway Home Companion"

It's a salute to one of my favorite NPR shows, A Prairie Home Companion.

Weston and I headed to A Prairie Home Companion at the Winspear last August

It speaks to the new home we're buying in Shreveport, LA. Our new home sits right on the golf course. Right on the FAIRWAY, to be exact.

This is a home where we will: watch Aubrey grow into a little girl, cook gourmet meals, invite family over for the Holidays, decorate, experience community with other Christ followers, recover from life's many hurts, and soak in God's blessings. This is where Aubrey will crawl for the first time, take her first steps, and speak her first words. It's the place where Weston and I will continue to grow closer to each other. It's the empty canvas for all of my creative and decorative whims. It's where I will learn how to potty train a little one and operate lawn equipment. It will be HOME.

So.... enjoy!

Our new home! Shreveport, LA